Creating APIs with NodeJS, DynamoDB and Lambda: A better approach with dynamoose
In this article, we'll create CRUD APIs with AWS Lambda and NodeJS and we'll be using Dynamoose to get better understanding of our DB model and to have a better workflow since Dynamoose takes away the pain of writing CloudFormation code for the DynamoDB table and other hassles.
Prerequisite
- I assume you've AWS account
- You also should've node, npm and serverless installed. If you don't have serverless installed, you can install it through npm using
npm i -g serverless- Since we'll be using Serverless Framework for deploying our stack, you've set-up the credentials with AWS. If not, Head towards the Serverless Documentation do the quick set-up.
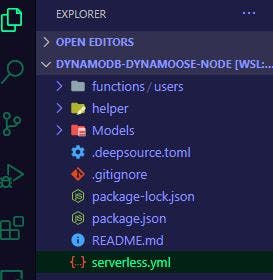
Here's the file structure we'll be using:

Getting Started
We need to generate a simple template serverless CLI. In order to do so:
sls create -t aws-nodejs
Now, Navigate into the directory and delete the handler.js file since we'll be creating our own handler.
Folder structure set-up
- First create 3 new directories namely functions, helper, and Model
- Inside the the functions directory, create another directory namely users
- Inside the helper directory, create two files, error.js and success.js
- Inside Model directory, create a new file called UserModel.js
APIs List
We'll be creating following 5 APIs related to users.
- createUser
- getAllUsers
- getUserById
- updateUser
- deleteUser
Installing required packages:
We need some npm packages in order to get our code working. so run the following command
npm i dynamoose uuid
npm i aws-sdk -D
Setting up CloudFormation code:
Open the Serverless.yml file and paste the following code:
service: dynamo-tut

provider:
  name: aws
  runtime: nodejs12.x
  region: us-east-1
  profile: personal #Replace it with your own profile name


  iamRoleStatements:
    - Effect: Allow
      Action:
        - dynamodb:DescribeTable
        - dynamodb:Query
        - dynamodb:Scan
        - dynamodb:GetItem
        - dynamodb:PutItem
        - dynamodb:UpdateItem
        - dynamodb:DeleteItem
        - dynamodb:CreateTable
      Resource: '*'

functions:
  writeToDB:
    handler: functions/users/createUser.main
    events:
      - http:
          path: addUser
          method: post
          cors: true

  getAllUsers:
    handler: functions/users/getAllUsers.main
    events:
      - http:
          path: getAll
          method: get
          cors: true

  getUserById:
    handler: functions/users/getUserById.main
    events:
      - http:
          path: getOne
          method: get
          cors: true

  updateUser:
    handler: functions/users/updateUser.main
    events:
      - http:
          path: update
          method: put
          cors: true

  deleteUser:
    handler: functions/users/deleteUser.main
    events:
      - http:
          path: delete
          method: delete
          cors: true
We're doing just basic stuffs, setting up provider details, AWS IAM Permissions for our lamba functions and then defining the handler for our functions with API Gateway attached.
Now, paste the following code in error.js and success.js inside helper directory
// success.js
const getSuccessResponse = (info) => {
  return {
    statusCode: 200,
    headers: {
      'Content-Type': 'application/json',
      'Access-Control-Allow-Origin': '*',
      'Access-Control-Allow-Credentials': true,
    },
    body: JSON.stringify({
      message: 'Request approved for performing operation',
      data: info,
      success: true,
    }),
  };
};

module.exports = { getSuccessResponse };

// error.js
const getErrorResponse = (info) => {
  console.log(info);
  return {
    statusCode: info.statusCode || 500,
    headers: {
      'Content-Type': 'text/plain',
      'Access-Control-Allow-Origin': '*',
      'Access-Control-Allow-Credentials': true,
    },
    body: JSON.stringify(info),
  };
};

module.exports = { getErrorResponse };
These functions ensures that our functions contains the response headers and cors policy so that our front-end will not have any issues. We'll use these helper functions to throw out responses.
Now, we need to define the Model which will be then used by Dynamoose to create DDB tables under the hood.
Create a file Models/UserModel.js and paste the following code:
const dynamoose = require('dynamoose');

const schema = new dynamoose.Schema(
  {
    id: {
      type: String,
      hashKey: true,
    },
    name: String,
    age: Number,
  },
  {
    timestamps: true,
  }
);

const UsersModel = dynamoose.model('userstable', schema, {
  create: true,
  throughput: {
    read: 5,
    write: 5,
  },
});
module.exports = { UsersModel };
Now, for the handler part, create 5 files inside functions/users and paste the following code:
// createUser.js

'use strict';

const { getSuccessResponse } = require('../../helper/success');
const { getErrorResponse } = require('../../helper/error');

const { v4: uuidv4 } = require('uuid');
const { UsersModel } = require('../../Models/UserModel');

module.exports.main = async (event) => {
  try {
    const request = JSON.parse(event.body);
    const { name, email } = request;

    const result = await UsersModel.create({
      id: uuidv4(),
      name,
      email,
    });

    return getSuccessResponse(result);
  } catch (error) {
    console.log(error);
    return getErrorResponse(error);
  }
};

// getAllUsers.js

'use strict';

const { getSuccessResponse } = require('../../helper/success');
const { getErrorResponse } = require('../../helper/error');

const { UsersModel } = require('../../Models/UserModel');

module.exports.main = async (event) => {
  try {
    const result = await UsersModel.scan().exec();
    return getSuccessResponse(result);
  } catch (error) {
    return getErrorResponse(error);
  }
};

// getUserById.js

'use strict';
const { getSuccessResponse } = require('../../helper/success');
const { getErrorResponse } = require('../../helper/error');

const { UsersModel } = require('../../Models/UserModel');

module.exports.main = async (event) => {
  try {
    const queryStringParameters = event.queryStringParameters;
    const { id } = queryStringParameters;

    const result = await UsersModel.get({ id });
    return getSuccessResponse(result);
  } catch (error) {
    return getErrorResponse(error);
  }
};

// updateUser.js

'use strict';

const { getSuccessResponse } = require('../../helper/success');
const { getErrorResponse } = require('../../helper/error');

const { UsersModel } = require('../../Models/UserModel');

module.exports.main = async (event) => {
  try {
    const request = JSON.parse(event.body);
    const { id, ...data } = request;

    const result = await UsersModel.update({ id }, { ...data });
    return getSuccessResponse(result);
  } catch (error) {
    return getErrorResponse(error);
  }
};

// deleteUser.js

'use strict';

const { getSuccessResponse } = require('../../helper/success');
const { getErrorResponse } = require('../../helper/error');

const { UsersModel } = require('../../Models/UserModel');

module.exports.main = async (event) => {
  try {
    const request = JSON.parse(event.body);
    const { id } = request;

    const result = await UsersModel.delete({ id });
    return getSuccessResponse(result);
  } catch (error) {
    return getErrorResponse(error);
  }
};
Deployment
For deployment, the following command will deploy the stack on AWS and return the endpoints for all the functions:
sls deploy -v
Testing
Once the deployment is complete, you'll find the endpoints in the output section of your terminal. Copy and paste those endpoints on Postman and hit with appropriate params and payload. If you've followed everything correctly, it will return you with results.
Here's the Repo with complete code written and tested.
Subscribe
If you like reading what i write, consider subscribing to the newsletter so you won't miss any stories.

